Ever wish you could make your own floofy pantaloons (sometimes called harem pants) so that you could save some money, or get just the right color?  Well, you totally can!  Here’s a relatively quick and easy way to do it.
Materials you need:
- Fabric (2-4 yards)
- Matching thread
- Sewing machine
- Ribbon or elastic for waistband
- Elastic for cuffs
- Safety pin
- Straight pins
Step 1: Preparing the Fabric
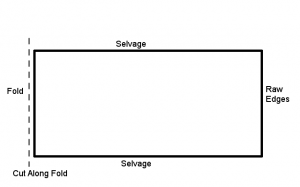
Start by determining if your fabric is wide enough as it is.  Width is determined by measuring from one finished edge (the selvage)  to the other.  Most fabric is about 45†wide, or about 60†wide.  For many people, 45†wide fabric is long enough to make these pantaloons.  Very tall folks (especially if they like their pantaloons very long and puddly) may prefer to get the 60†fabric (or to buy extra fabric to sew onto the top edge of the pants (at the waist area) to make them longer).
Now, if you expect to have to add width to your fabric, cut and set aside some fabric for that purpose first. Â (Half a yard seems to usually be plenty.) Â Take the rest of the fabric and fold it in half width-wise, so that the fold runs perpendicular to the finished edges. Â Cut along the fold. Â You should now have two big rectangles of fabric – each one will become a pant leg.
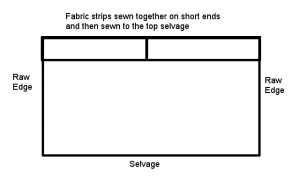
If you need to add width to make the pants long enough, do so now by cutting the extra fabric you reserved earlier into strips, sewing them together so that you end up with two strips the same length as your leg fabric. Â Sew one strip onto the top of each rectangle so that they are wider (width would now be measured from one finished edge to the edge of the strip that was just attached).
Step 2: Cutting the Seat
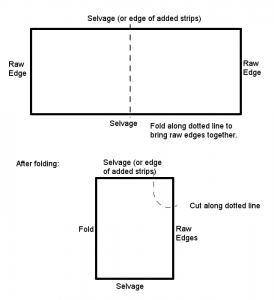
The next step is to cut out a notch for the seat of the pantaloons. Â To do this, measure from where you wish to wear the waist of the pants in the front of your body, down between your legs and back up to wear you wish to wear the waist of the pants in the back of your body. Â Divide this number in half, then add 2. Â The resulting value is how long the notch needs to be.
With your two rectangles on top of each other, fold them again width-wise (so that all 4 raw edges are together). Â This way you will only have to cut your notch once. Â Use your tape measure to lay out a J shape on the raw edges that is the length you determined in the last step. Â The top of the J should be at the top edge of the rectangle and the bottom part should be at the side edge. Â Cut out the notch.
Step 3: Sewing the Inside Leg and Seat
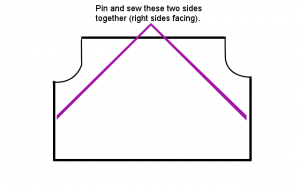
Separate the two pieces of fabric. Â Fold each one, right sides together, so that the bottom of the notches match up. Â Pin the raw edges together along this edge (this will make the inside leg seam). Â Sew edges together, repeat for the other leg. Â Notice how, when the leg is sewn together in this way, the J shaped notches you cut out earlier are combined to make a big U shape on each leg.
Turn the pant legs right side out. Â Match them up to one another starting at the center of the U, putting the inside leg seams together (keep the fabric right sides together). Â Pin along the edge of the big U shape, and sew together.
Step 4: Making the Waistband Casing
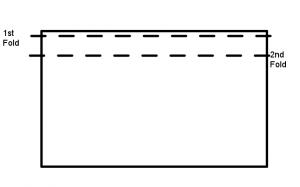
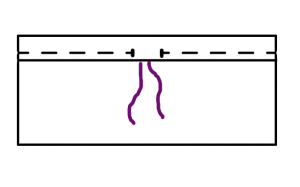
It’s time now to make the waistband.  Fold over ½ inch of fabric to the inside of the pants, all the way around the edge of the waistband and press it.  Then fold another 1 ½ inch all the way around and pin it in place.  Starting at the center (front or back, they are both the same in this case), stitch around the edge, keeping the stitches close to the first fold (where the ½ inch was folded under).  Do not stitch all the way around, leave a gap about 1 inch wide to thread your ribbon or elastic through.  Be sure to tack or backstitch your thread at each end of your seam to secure it.
If using elastic that will be permanently stitched in place, determine how long it needs to be to fit comfortably and add an inch.  For drawstrings, take a piece of ribbon (or cord, or whatever you like) that is long enough to go around your hips, with plenty of extra length to tie it at the right size for your waist.  Safety pin one end of the elastic/ribbon, and start threading it through the waistband casing (the safety pin makes it a bit easier, big safety pins are best).  Pin the other end inside the pants near where you started, so that it won’t get pulled inside the waistband such that you have to fish it out.  If you’re using elastic, once you get all the way around, pull the safety pin out, overlap the two ends of the elastic ½ inch (make sure it’s not twisted), and stitch the two ends of the elastic together and tuck it back into the waistband casing.  If using a drawstring, keep pulling the safety pinned end through until the two ends are roughly equal in length. Remove the safety pin, knot the ends of the drawstring.  (You can always shorten and re-knot them later if they are two long.)
Step 5: Leg Casing
Now, try on your pants!  You’ll need to fold under about 1 – 1 ½ “ (depending on the width of your elastic) of fabric on each leg to make another casing for elastic (repeat the same procedure as for the waistband, but use narrower elastic, in a size comfortable for your legs).  When you try on your pants, they should be several inches too long (to allow for the elastic cuff to be added, and then to ‘poof’ out above the cuff).  If you think they will be too long, even considering that, trim them a bit before making the casing for the elastic.
Once the legs are trimmed as needed, repeat the procedure from the waistband to make a narrower casing for the leg elastic, thread the elastic through and stitch the elastic ends together and you are done!


do you have an rss feed?
Sure do! There’s a link in the purple bar at the top of the page – and also here for convenience: http://www.shamblingshimmies.com/feed/
Great information over again! I am looking forward for your next post=)